Appearance
Effect Reference
This page lists every effect currently available in Miao, what it is for, and what each parameter changes.
Where Effects Live
Miao has two effect surfaces:
| Surface | Where to open it | What it affects |
|---|---|---|
| Track Effects | Select an audio or MIDI track, open Track, then Mix. | The selected source track before it reaches routing, sends, buses, and the master output. |
| Master Effects | Select the Master track, open Track, then Master Effects. | The final summed mix before Master track-head volume, balance, mute, realtime playback, and export. |
Bus and master tracks do not use Track Effects. Track Effects are for audio and MIDI tracks. Master Effects are for the final output chain.
Track Effects run as a real serial insert chain in the order shown in the rack. Duplicate inserts of the same type are allowed and stack as separate processors. Bypass keeps the insert, settings, position, and automation identity while disabling processing; remove deletes the insert from the chain.
The full mix path is source region or MIDI instrument, Track Effects, track controls, sends/routing, bus returns, Master Effects, then Master track-head mute/volume/balance. Stems are source-track based and do not include final Master Effects or final Master track-head controls.
Effect Screenshots
These screenshots are captured from the current Master Effects UI. Track Effects use the same compact module visual style. The shared Output screenshot covers Limiter controls, and Filter / EQ covers the EQ and Auto-filter controls that are combined on the master surface.


Visual Language
Effects have compact visual skins in the app. The visuals are diagnostic and help you recognize the module quickly; the sliders, switches, select boxes, and presets control the sound.
| Visual | Used by | Meaning |
|---|---|---|
| Meter bars and spectrum | Meter, Master Meter | Peak/RMS level, stereo correlation, LUFS-style loudness, and frequency energy. |
| EQ curve | EQ, Parametric EQ | Tone shaping, filter slope, shelf/bell/notch moves, and spectrum overlay on the master Parametric EQ. |
| Threshold curve | Gate, Compressor, De-esser, Dynamic EQ, Multiband Dynamics | Where dynamics start acting and how strongly they reduce level. |
| Transfer curve | Saturation, Pedal, Clipper, Amp / Cab, Bitcrusher | Nonlinear drive, clipping, tone, and digital reduction character. |
| Modulation waves | Chorus, Flanger, Phaser, Tremolo, Auto-pan, Auto-filter | LFO movement, depth, sync, and rate. |
| Taps and tails | Delay, Reverb, Room | Echo timing, feedback, predelay, reverb tail, room size, and width. |
| Pitch and modal views | Pitch, Shifter, Resonator, Vocoder | Pitch offsets, frequency shifting, tuned resonances, or carrier bands. |
Shared Controls
Several parameters repeat across effects:
| Control | What it means |
|---|---|
| Mix | Wet/dry blend. At 0%, you hear the original signal. At 100%, you hear the processed signal. |
| Gain / Output | Level trim before or after the processor. Use this to level-match when an effect makes a track louder or quieter. |
| Threshold | Level where a dynamics processor starts acting. Lower thresholds catch more signal. |
| Ratio | Strength of compression or dynamic EQ after the threshold. Higher ratios reduce level more aggressively. |
| Attack | How quickly a dynamics processor reacts after the signal crosses the threshold. |
| Release | How quickly gain returns after the signal falls back. |
| Rate | Free-running LFO speed in Hz when sync is off. |
| Sync | Locks the effect movement or delay timing to the project tempo. |
| Division | Musical timing value used when sync is on: 1/16, 1/8T, 1/8, 1/8D, 1/4, 1/4D, 1/2, or 1 bar. |
| Frequency | The target frequency for filters, resonators, pitch/frequency shifting, or detection bands. |
| Q | Bandwidth. Higher Q is narrower and more surgical. Lower Q is broader and smoother. |
Common Starting Points and Mistakes
| Goal | Start with | Watch for |
|---|---|---|
| Fix tone quickly | EQ or Parametric EQ. Cut before boosting. | Narrow boosts can sound harsh. Level-match after large moves. |
| Control dynamics | Compressor, Gate, Transient, Multiband Dynamics, De-esser, or Dynamic EQ. | Too-low thresholds can flatten the part or remove transients. |
| Duck one track from another | Compressor on the target track with Sidechain Source set to the key track. | Route the key to None for silent triggering instead of muting it. |
| Add loudness | Clipper for peak shaving, then Limiter for final control. | Distortion and pumping are signs to back off drive, threshold, or release. |
| Add width | Utility, Chorus, Reverb, or Delay. | Check mono and avoid widening low bass too much. |
| Add space | Reverb, Room, or tempo-synced Delay. | High Mix or long decay can hide the dry sound. |
| Sound design | Pitch, Shifter, Resonator, Vocoder, Bitcrusher, Pedal, or Amp / Cab. | Creative processors can change level and phase dramatically. |
If an inserted effect is not audible, confirm the insert is enabled, Mix is not 0%, the track is routed to an audible output, automation is not forcing a neutral value, and the effect is placed before or after other inserts as intended.
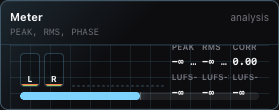
Meter
What it does: An analyzer-only module. It does not change audio.
Use it for: Checking track level, master peak, RMS, stereo correlation, LUFS-style loudness, and broad frequency balance.
| Parameter | What it changes |
|---|---|
| None | Meter has no sound-shaping parameters. |
On the Master Effects surface, Meter shows peak, RMS, correlation, momentary LUFS, short-term LUFS, integrated LUFS, and spectrum. As a Track Effect, Meter is a lightweight analyzer for that track.
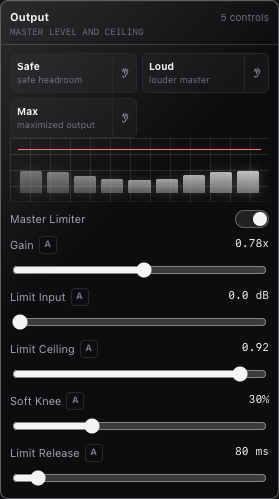
Output and Limiter
What it does: Controls master output level and final peak control. The Limiter can also be used as a simple maximizer by increasing input drive into the ceiling.
Use it for: Final loudness, export headroom, and preventing peaks from exceeding the selected ceiling.
| Parameter | What it changes |
|---|---|
| Gain | Overall master effect-chain gain. |
| Limiter Enabled | Master switch for the limiter on the Master Effects output module. |
| Limit Input | Drive into the limiter. Higher values increase loudness and gain reduction. |
| Limit Ceiling | Maximum output peak target. Lower values leave more headroom. |
| Soft Knee | Smoothness of the limiter transition near the ceiling. |
| Limit Release | How quickly limiting recovers after peaks. |
The Master track-head volume, balance, and mute sit after Master Effects and affect realtime playback and export. The Track Effect named Limiter uses the limiter controls from this section without the Master-only output gain and mute controls.
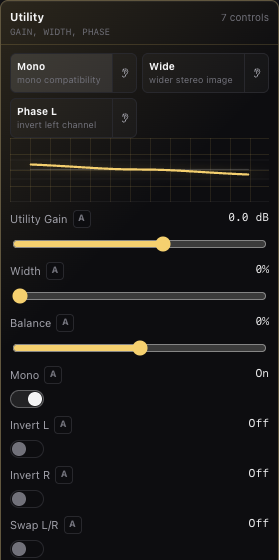
Utility
What it does: Practical gain and stereo utility processor.
Use it for: Gain staging, mono checks, stereo width, balance fixes, phase inversion, and left/right swaps.
| Parameter | What it changes |
|---|---|
| Utility Gain | Adds or removes level in dB. |
| Width | Narrows, preserves, or widens stereo image. |
| Balance | Moves level toward left or right. |
| Mono | Sums left and right to mono. |
| Invert L / Invert R | Flips polarity of the selected channel. |
| Swap L/R | Exchanges left and right channels. |
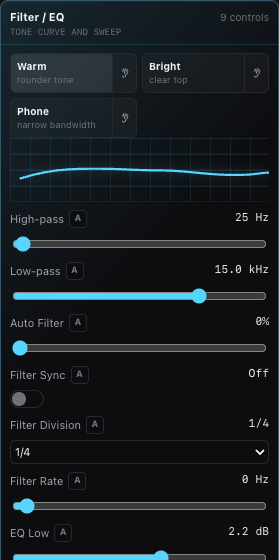
EQ
What it does: Simple tone shaping with high-pass, low-pass, and low/mid/high gain controls.
Use it for: Fast cleanup and broad tonal moves.
| Parameter | What it changes |
|---|---|
| High-pass | Removes low frequencies below the selected cutoff. |
| Low-pass | Removes high frequencies above the selected cutoff. |
| EQ Low | Boosts or cuts the low band. |
| EQ Mid | Boosts or cuts the mid band. |
| EQ High | Boosts or cuts the high band. |
The Master Filter / EQ module also includes Auto Filter controls listed below.
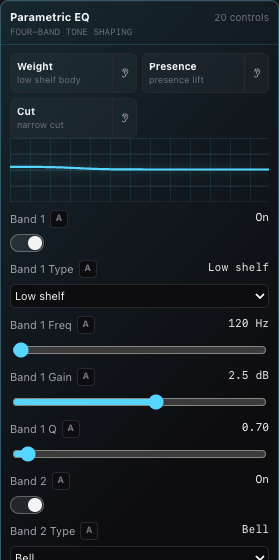
Parametric EQ
What it does: Four-band parametric EQ with switchable filter types.
Use it for: Surgical cuts, resonant cleanup, broad shelves, presence boosts, and tonal balancing.
| Parameter | What it changes |
|---|---|
| Band 1-4 | Enables or bypasses the band. |
| Band Type | Bell, Low shelf, High shelf, or Notch. |
| Band Freq | Center or cutoff frequency. |
| Band Gain | Boost or cut amount. Notch uses the selected frequency as a removal point. |
| Band Q | Bandwidth. Higher Q is narrower. |
The Master Parametric EQ visualizer overlays the live spectrum so you can compare EQ moves against audible energy.
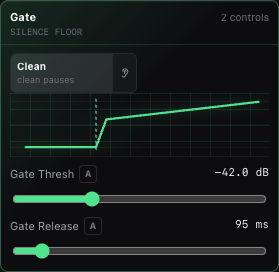
Gate
What it does: Reduces signal below a threshold.
Use it for: Cleaning noise between phrases, tightening drums, and muting quiet bleed.
| Parameter | What it changes |
|---|---|
| Gate Thresh | Level below which the gate closes. |
| Gate Release | How quickly the gate returns after the signal falls below the threshold. |
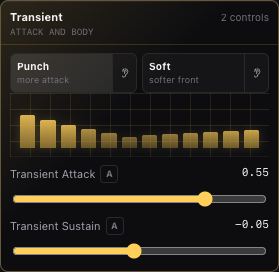
Transient
What it does: Shapes the front and body of a sound.
Use it for: Making drums punchier, softening clicks, or changing sustain without full compression.
| Parameter | What it changes |
|---|---|
| Transient Attack | Positive values emphasize attack; negative values soften attack. |
| Transient Sustain | Positive values extend body; negative values tighten decay. |
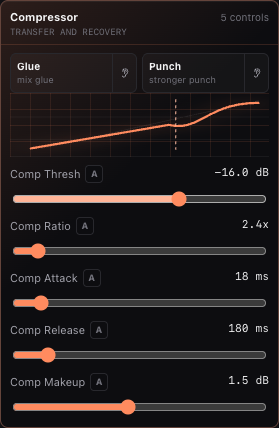
Compressor
What it does: Reduces dynamic range when signal crosses the threshold. Track compressors can use another audio or MIDI track as a sidechain key input.
Use it for: Glue, punch, vocal control, bass consistency, and ducking.
| Parameter | What it changes |
|---|---|
| Comp Thresh | Level where compression begins. |
| Comp Ratio | Strength of compression above the threshold. |
| Comp Attack | How quickly compression clamps down. |
| Comp Release | How quickly compression lets go. |
| Comp Makeup | Output gain after compression. |
| Sidechain Source | Track Effects only. Chooses another audio or MIDI track to trigger compression. |
For ducking, put Compressor on the track you want to lower, then set Sidechain Source to the track that should trigger the lowering.
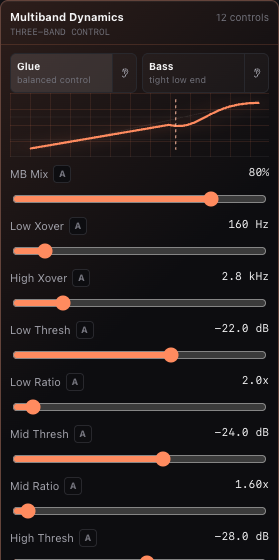
Multiband Dynamics
What it does: Splits the signal into low, mid, and high bands and compresses each band separately.
Use it for: Bass control, bright top-end taming, mix glue, and frequency-specific dynamics.
| Parameter | What it changes |
|---|---|
| MB Mix | Wet/dry blend for the multiband processor. |
| Low Xover | Boundary between low and mid bands. |
| High Xover | Boundary between mid and high bands. |
| Low / Mid / High Thresh | Compression threshold per band. |
| Low / Mid / High Ratio | Compression strength per band. |
| MB Attack | How quickly all bands react. |
| MB Release | How quickly all bands recover. |
| MB Output | Output gain after multiband processing. |
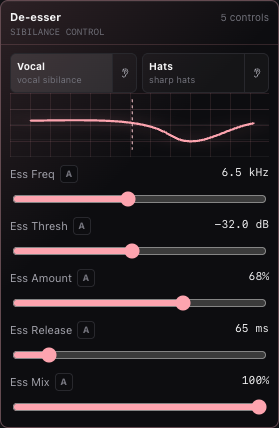
De-esser
What it does: Dynamically turns down harsh high-frequency content around the selected frequency.
Use it for: Vocal sibilance, sharp hi-hats, brittle cymbals, and harsh consonants.
| Parameter | What it changes |
|---|---|
| Ess Freq | High-frequency area to watch. |
| Ess Thresh | Level where de-essing begins. |
| Ess Amount | How much high-band reduction is applied. |
| Ess Release | Recovery time after sibilance passes. |
| Ess Mix | Wet/dry blend. |
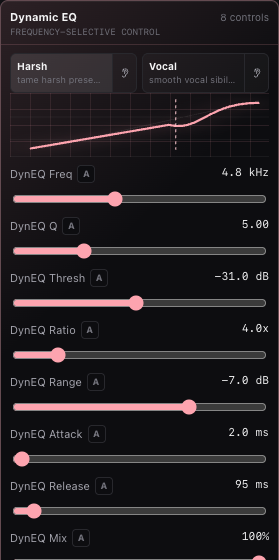
Dynamic EQ
What it does: Watches one EQ band and reduces it dynamically when that band gets too loud.
Use it for: Resonances, nasal vocal peaks, harsh guitars, boxy drums, or sibilance that should only be cut when active.
| Parameter | What it changes |
|---|---|
| DynEQ Freq | Frequency being detected and reduced. |
| DynEQ Q | Width of the detection/reduction band. |
| DynEQ Thresh | Level where reduction starts. |
| DynEQ Ratio | Strength of dynamic reduction. |
| DynEQ Range | Maximum allowed gain reduction. |
| DynEQ Attack | Reaction time. |
| DynEQ Release | Recovery time. |
| DynEQ Mix | Wet/dry blend. |
Saturation
What it does: Adds harmonic drive with soft nonlinear shaping.
Use it for: Warmth, thickness, audible presence, or gentle grit.
| Parameter | What it changes |
|---|---|
| Sat Drive | Amount of drive into the saturation curve. |
| Sat Mix | Wet/dry blend. |
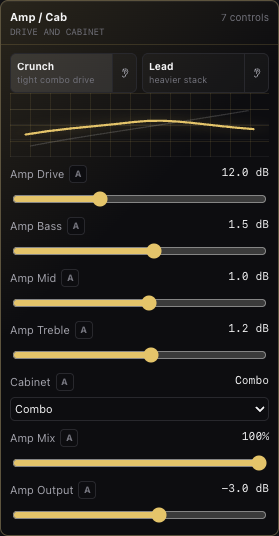
Amp / Cab
What it does: Guitar/bass-style amp drive with a tone stack and cabinet voicing.
Use it for: Guitar, bass, synth leads, drum distortion, and re-amping clean sounds.
| Parameter | What it changes |
|---|---|
| Amp Drive | Amount of pre-cabinet distortion. |
| Amp Bass | Low tone-stack gain. |
| Amp Mid | Mid tone-stack gain. |
| Amp Treble | High tone-stack gain. |
| Cabinet | Open, Combo, or Stack cabinet voicing. |
| Amp Mix | Wet/dry blend. |
| Amp Output | Output level after amp and cabinet. |
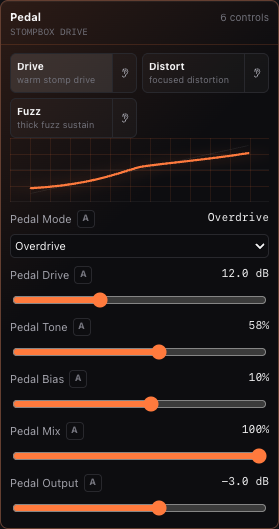
Pedal
What it does: Stompbox-style distortion before heavier amp shaping.
Use it for: Overdrive, distortion, fuzz, synth grit, and drum edge.
| Parameter | What it changes |
|---|---|
| Pedal Mode | Overdrive, Distortion, or Fuzz. |
| Pedal Drive | Input drive into the pedal. |
| Pedal Tone | Brightness and tone filtering. |
| Pedal Bias | Shifts the distortion curve for asymmetry. |
| Pedal Mix | Wet/dry blend. |
| Pedal Output | Output trim after the pedal. |
Clipper
What it does: Limits peaks by soft or hard clipping.
Use it for: Peak shaving, loud drums, aggressive buses, and pre-limiter control.
| Parameter | What it changes |
|---|---|
| Clip Drive | Pushes signal into clipping. |
| Clip Ceiling | Maximum clipping level. |
| Clip Mix | Wet/dry blend. |
| Clip Mode | Soft or Hard clipping. |
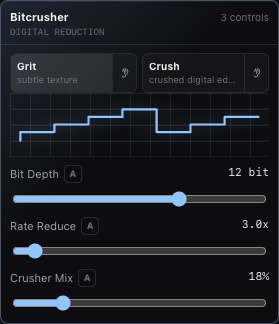
Bitcrusher
What it does: Reduces bit depth and sample-rate detail.
Use it for: Lo-fi drums, retro digital texture, robotic artifacts, and harsh sound design.
| Parameter | What it changes |
|---|---|
| Bit Depth | Resolution of the quantized signal. Lower is rougher. |
| Rate Reduce | Sample-rate reduction factor. Higher is more aliased. |
| Crusher Mix | Wet/dry blend. |
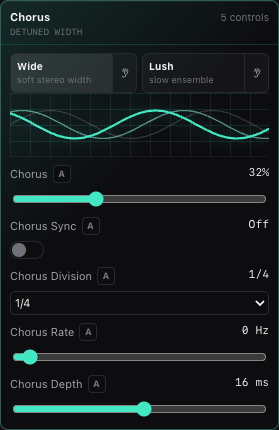
Chorus
What it does: Adds short modulated delays for detuned width.
Use it for: Wider vocals, synth pads, guitars, and subtle stereo movement.
| Parameter | What it changes |
|---|---|
| Chorus | Wet/dry blend. |
| Chorus Sync | Locks modulation to project tempo. |
| Chorus Division | Musical LFO cycle length when sync is on. |
| Chorus Rate | Free-rate LFO speed when sync is off. |
| Chorus Depth | Delay modulation depth. |
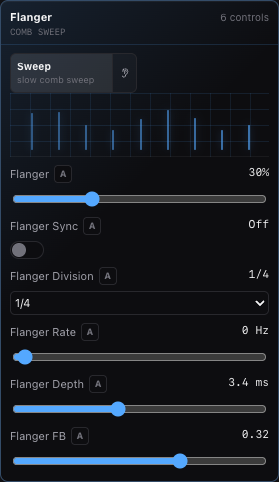
Flanger
What it does: Adds a very short modulated delay with feedback for comb-filter sweeps.
Use it for: Sweeping metallic motion, jet-like transitions, and dramatic modulation.
| Parameter | What it changes |
|---|---|
| Flanger | Wet/dry blend. |
| Flanger Sync | Locks modulation to project tempo. |
| Flanger Division | Musical LFO cycle length when sync is on. |
| Flanger Rate | Free-rate LFO speed when sync is off. |
| Flanger Depth | Delay modulation depth. |
| Flanger FB | Feedback amount and polarity. |
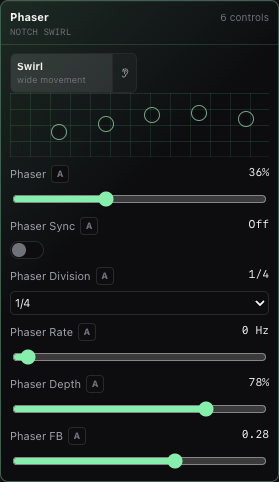
Phaser
What it does: Moves phase notches through the signal.
Use it for: Swirling guitars, pads, keys, percussion movement, and gentle animation.
| Parameter | What it changes |
|---|---|
| Phaser | Wet/dry blend. |
| Phaser Sync | Locks modulation to project tempo. |
| Phaser Division | Musical LFO cycle length when sync is on. |
| Phaser Rate | Free-rate LFO speed when sync is off. |
| Phaser Depth | Notch sweep depth. |
| Phaser FB | Feedback around the phase network. |
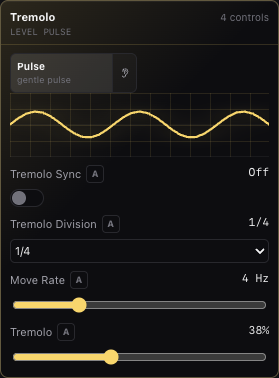
Tremolo
What it does: Modulates volume over time.
Use it for: Pulsing guitars, rhythmic synths, transitions, and tempo-locked level movement.
| Parameter | What it changes |
|---|---|
| Tremolo Sync | Locks movement to project tempo. |
| Tremolo Division | Musical LFO cycle length when sync is on. |
| Move Rate | Free-rate LFO speed when sync is off. |
| Tremolo | Volume modulation depth. |
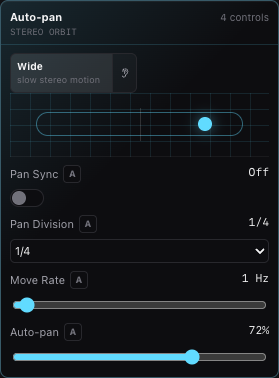
Auto-pan
What it does: Moves signal left and right over time.
Use it for: Stereo motion, rhythmic ear candy, and widening repeated parts.
| Parameter | What it changes |
|---|---|
| Pan Sync | Locks movement to project tempo. |
| Pan Division | Musical LFO cycle length when sync is on. |
| Move Rate | Free-rate LFO speed when sync is off. |
| Auto-pan | Stereo movement depth. |
Auto-filter
What it does: Sweeps the low-pass filter cutoff over time.
Use it for: Filter movement, transitions, rhythmic dull/bright motion, and build-ups.
| Parameter | What it changes |
|---|---|
| Low-pass | Highest allowed cutoff for the sweep. |
| Auto Filter | Sweep depth. |
| Filter Sync | Locks the sweep to project tempo. |
| Filter Division | Musical LFO cycle length when sync is on. |
| Filter Rate | Free-rate LFO speed when sync is off. |
On the Master Effects surface, Auto-filter is inside Filter / EQ. As a Track Effect, it appears as Auto-filter.
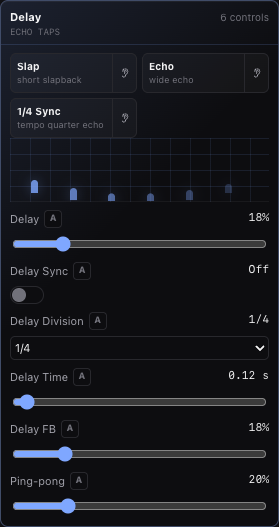
Delay
What it does: Adds echoes using free time or project-tempo divisions.
Use it for: Slapback, rhythmic repeats, dub throws, stereo echoes, and transitions.
| Parameter | What it changes |
|---|---|
| Delay | Wet/dry blend. |
| Delay Sync | Uses project tempo instead of seconds. |
| Delay Division | Musical delay time when sync is on. |
| Delay Time | Delay time in seconds when sync is off. |
| Delay FB | Echo feedback amount. |
| Ping-pong | Cross-channel echo movement. |
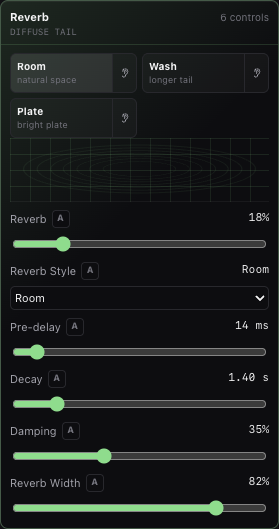
Reverb
What it does: Adds algorithmic space.
Use it for: Room, hall, or plate ambience, depth, and tails.
| Parameter | What it changes |
|---|---|
| Reverb | Wet/dry blend. |
| Reverb Style | Room, Hall, or Plate. |
| Pre-delay | Delay before the reverb tail begins. |
| Decay | Tail length. |
| Damping | High-frequency absorption in the tail. |
| Reverb Width | Stereo width of the wet signal. |
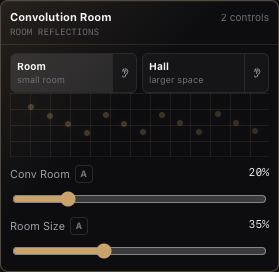
Room
What it does: Adds convolution-style early room reflections.
Use it for: Small-room glue, realistic reflections, and short ambience.
| Parameter | What it changes |
|---|---|
| Conv Room | Wet/dry blend. |
| Room Size | Reflection spacing and perceived room size. |
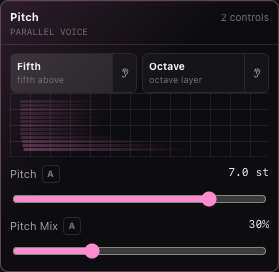
Pitch
What it does: Adds a parallel pitch-shifted voice.
Use it for: Octaves, fifths, harmonized layers, and special effects.
| Parameter | What it changes |
|---|---|
| Pitch | Semitone shift from -12 to +12. |
| Pitch Mix | Wet/dry blend. |
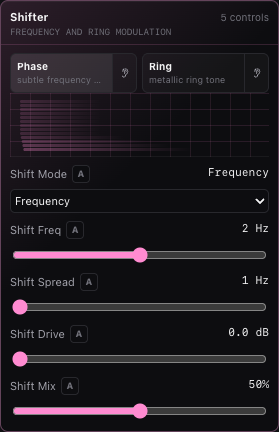
Shifter
What it does: Frequency shifting or ring modulation, with optional stereo spread and drive.
Use it for: Metallic tones, sidebands, unusual motion, tremolo-like effects, and sound design.
| Parameter | What it changes |
|---|---|
| Shift Mode | Frequency or Ring mode. |
| Shift Freq | Shift/modulation frequency. |
| Shift Spread | Difference between left and right shift amounts. |
| Shift Drive | Drive before the shifter output. |
| Shift Mix | Wet/dry blend. |
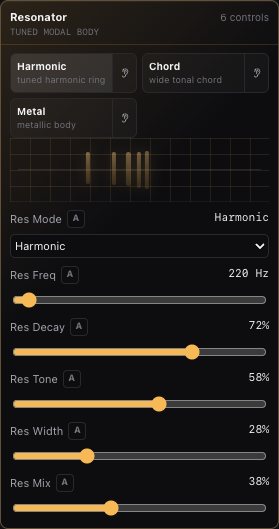
Resonator
What it does: Adds tuned modal ringing at harmonically related frequencies.
Use it for: Making drums, noise, or loops feel pitched; adding body; metallic ringing; chord-like resonance.
| Parameter | What it changes |
|---|---|
| Res Mode | Harmonic, Chord, or Metal resonance pattern. |
| Res Freq | Root resonance frequency. |
| Res Decay | Ring length. |
| Res Tone | Brightness and harmonic emphasis. |
| Res Width | Stereo spread of resonance modes. |
| Res Mix | Wet/dry blend. |
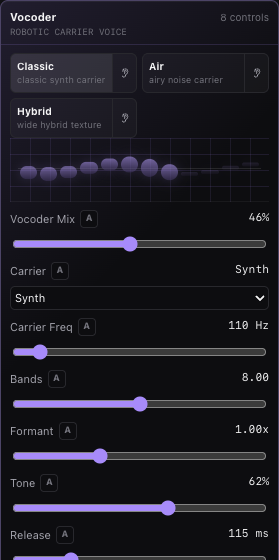
Vocoder
What it does: Uses the track signal as a modulator and an internal carrier to create robotic or synthetic textures.
Use it for: Robotic voice, synth speech, drum vocoding, noise textures, and rhythmic carrier effects.
| Parameter | What it changes |
|---|---|
| Vocoder Mix | Wet/dry blend. |
| Carrier | Synth, Noise, or Hybrid internal carrier. |
| Carrier Freq | Pitch/frequency of the internal synth carrier. |
| Bands | Number of analysis bands. |
| Formant | Shifts the perceived vocal/formant character. |
| Tone | Carrier brightness and band tilt. |
| Release | How quickly band envelopes recover. |
| Voc Output | Output trim after vocoding. |
Automation
Most sound-shaping parameters in Track Effects and Master Effects can be automated. Click the A button beside a parameter to open its automation lane. Automation supports linear and stepped interpolation.
Good starting points:
| Goal | Automate |
|---|---|
| Transition build | Low-pass, Auto Filter depth, Delay mix, Reverb mix. |
| Rhythmic movement | Tremolo depth, Auto-pan depth, Phaser mix, synced divisions. |
| Ducking | Compressor sidechain source and compressor threshold. |
| Vocal cleanup | De-esser threshold, Dynamic EQ threshold, Parametric EQ gain. |
| Master finish | Gain, Limit Input, Limit Ceiling, Reverb mix. |