Appearance
Workspace Tour
Miaou uses a dense desktop DAW layout. The first screen is the working surface, not a marketing page. This tour explains what each surface owns so you can choose the right place before editing.
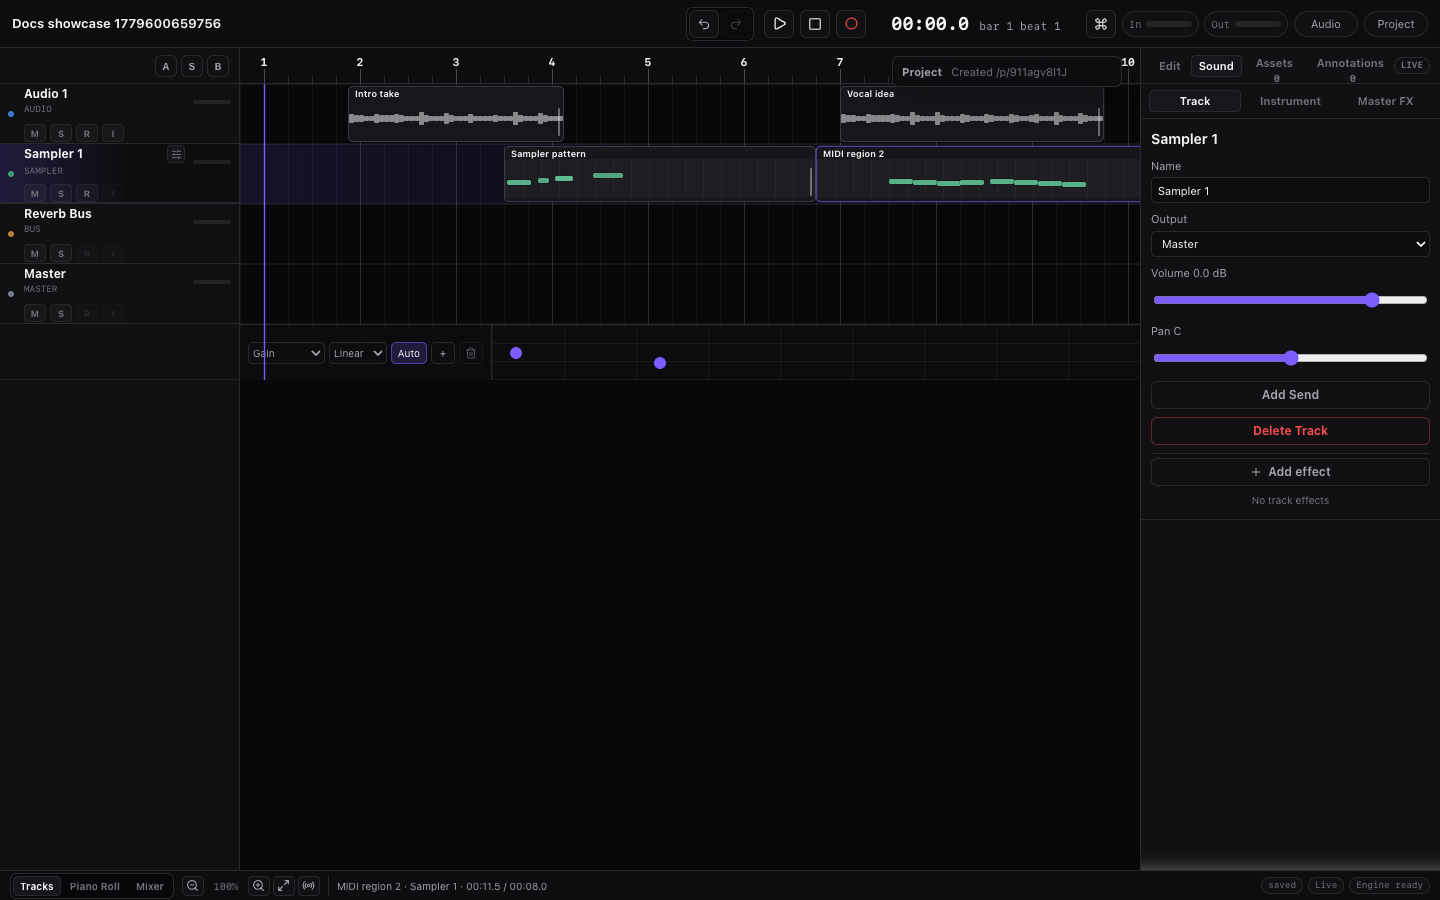
Workspace Map
Each area has a stable job:
| Area | Use it for | Avoid expecting it to... |
|---|---|---|
| Top transport bar | Playback, recording, project tempo, metronome/count-in, input level, save/share/export. | Edit the selected region, instrument, effect, or marker in detail. |
| Chord lane | Project harmony, chord blocks, progression sketching, chord-to-MIDI source material. | Replace the Piano Roll for detailed note editing. |
| Track headers | Track identity, mute/solo/record/monitor, meters, volume/pan, track order, target selection. | Hold every mix, instrument, and routing control at full size. |
| Timeline lanes | Regions, markers, automation rows, playhead, range navigation, region edits. | Store instrument or effect settings directly. |
| Right dock | Inspector panels, Instrument, and timeline markers. | Act as a second timeline. |
| Bottom panel | Focused editors: Piano Roll, Keyboard, MIDI Tools, Audio, Automation, and timeline utilities. | Show every editor at once. |
| Status bar | Grid/snap, zoom, selection count, recent edit feedback, save/collab/export/audio status. | Become a running message feed. |
When you feel lost, select the object you want to change first. The track header, selected region/chord/note, right dock, and bottom editor should all point at the same work target.
Read the Workspace in Order
When the screen feels dense, read it in three passes instead of scanning every control at once:
| Pass | Look here | Answer this question |
|---|---|---|
| Project state | Top transport bar and status area. | Is this a draft, saved project, unlocked session, or export state? |
| Work target | Selected track header, selected region/chord/note, right dock. | What exact track, clip, chord, marker, or parameter will change? |
| Editing surface | Timeline lane, right dock tab, bottom panel, or context menu. | Am I using the surface that owns this edit? |
Example: to change a bass instrument, first confirm the project is saved if the change matters, then select the bass MIDI track, then open Instrument and read its target label before loading the new instrument. To edit the bass notes, select the bass MIDI region instead and use Piano Roll. To compress the bass, keep the bass track selected and use Inspector > Mix.
If the wrong thing changes, press Cmd+Z, select the intended object again, and repeat the action from the surface that owns that edit.
Understand the Active Target
Miaou can show several selections at once: a track can be selected, a region can be selected, MIDI notes can be selected in the Piano Roll, and a marker or chord can also be visible. That is normal for a DAW. Before using a command, read which target the command will affect.
| Target | Where to read it | What it controls |
|---|---|---|
| Track target | Highlighted track header, Inspector > Mix, Instrument. | Instrument loading, track effects, routing, record arm, monitor, volume, pan. |
| Region or clip target | Selected region on the timeline, Inspector > Selection. | Region trim, fades, clip gain, loop, audio tools, MIDI clip tools, takes. |
| MIDI edit target | Bottom Piano Roll, selected MIDI region or selected notes. | Note drawing, note preview, velocity, transpose, note copy/paste, note delete. |
| Chord target | Selected Chord Track block, Inspector > Selection. | Chord symbol edits, preview, chord-to-MIDI, analyze/review/generation controls. |
| Automation target | Visible automation lane label and selected points. | Point move, value edits, interpolation, copy/paste, enable/disable automation. |
| Recording target | Transport target chip before pressing Record. | Whether Miaou records audio, MIDI notes, loop takes, or nothing. |
| Shortcut target | The last editor surface you clicked or used. | Cmd+A, copy, paste, duplicate, delete, nudge, split, and related edit actions. |
If two places disagree, click the object or editor surface you want to affect. For exact placement, use the context menu at the lane, note, chord, marker, automation point, or ruler position instead of a global shortcut.
Where to Work
Use this as the quick routing map before you start clicking:
| You want to... | Go to | Confirm before acting |
|---|---|---|
| Play, stop, record, set BPM, or export | Top transport bar. | Project is saved/unlocked when recording, sharing, exporting, or relying on imported media. |
| Move, split, trim, fade, or loop clips | Timeline lanes and region context menus. | The intended region or region group is selected. |
| Add or edit chords | Chord Track below the ruler, then Inspector > Selection. | The selected chord block and key/scale controls match the progression you are editing. |
| Draw MIDI notes or drum hits | Bottom Piano Roll or Drum Grid. | The selected MIDI region and instrument target are the part you want to hear. |
| Play from the computer keyboard | Bottom Keyboard. | The active MIDI track/region is loaded with the instrument you intend. |
| Import/export MIDI or transform notes | Bottom MIDI Tools. | A MIDI region or MIDI notes are selected when the action should affect existing notes. |
| Import, analyze, slice, or sample audio | Bottom Audio plus Inspector > Selection. | The selected audio region shows waveform content and the right Source BPM/follow-tempo intent. |
| Change a track instrument | Right dock Instrument. | The Load into target is the selected MIDI track. Preview buttons audition; clicking a row loads it. |
| Mix one track or bus | Inspector > Mix. | The selected track/bus is the channel you intend to change. |
| Change final output | Inspector > Master. | You are editing final mix behavior; stems do not include these final output controls. |
| Add or edit automation | Parameter A buttons, bottom Automation, and lanes. | The visible automation lane names the parameter you intend to move. |
| Add sections or timeline reminders | Right dock Markers and marker context menus. | The marker label and section range match the song part you want to affect. |
| Find a command by name | Actions search with Cmd+K. | The active target is already clear; use a context menu for exact placement. |
Target Check Routine
Before using a command that can change an instrument, timing, generated MIDI, recording, routing, export, or deletion, check these in order:
- Select the track, region, chord, marker, note, automation point, or lane that should change.
- Read the right dock or bottom editor target label. It should name the same object.
- If an instrument will change, read the Instrument target before loading an instrument.
- If a mix setting will change, open Inspector > Mix or Inspector > Master and check the channel name.
- If recording, read the transport target chip before pressing Record.
- If placement matters, use the context menu at the target lane or beat instead of a global shortcut.
Use Cmd+Z immediately if the wrong object changes. Most wrong-target edits are normal undoable project edits.
Top Transport Bar
The transport bar contains:
| Area | Purpose |
|---|---|
| Project title | Shows the current draft or project name. |
| Undo/Redo | Global edit history for arrangement, MIDI, track, chord, marker, effect, and automation edits. |
| Play/Stop toggle | Starts playback and changes to Stop while playback is running. |
| Record | Starts, stops, or cancels recording. |
| BPM | Sets the project tempo at the start of the project. |
| Metronome/Count-in | Controls click playback and recording count-in. |
| Time readout | Shows minutes/seconds by default; bars/beats appears when the ruler is in bars. |
| Input meter | Shows input level while recording or monitoring. |
| Project actions | Save drafts, share links, export ZIP files, and open History. |

Timeline
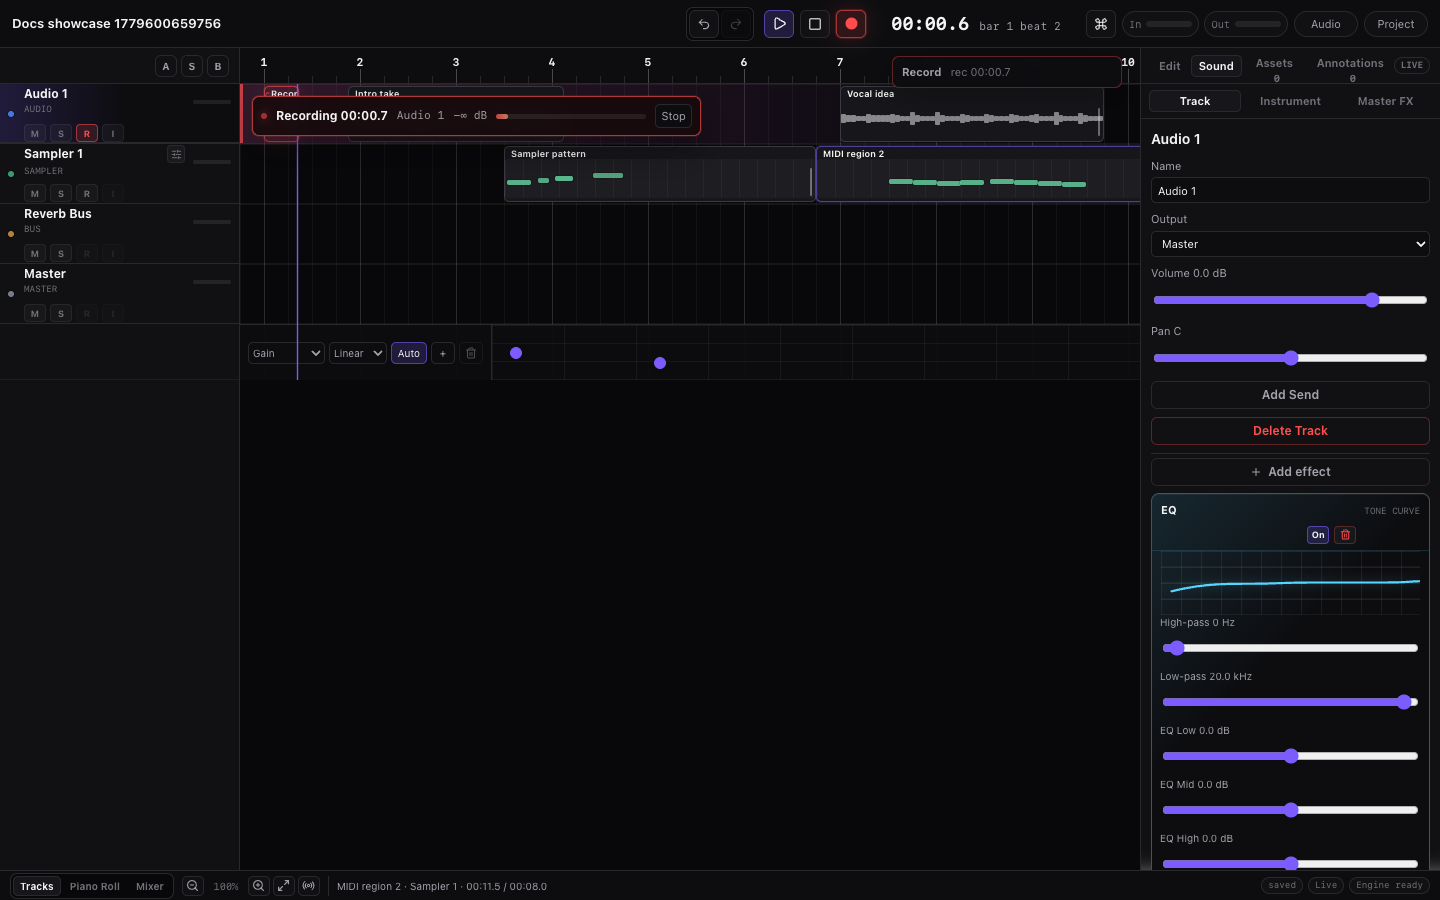
The central timeline contains the ruler, chord lane, track lanes, regions, markers, remote playheads, and the playhead. Master automation appears as an extra row under the Master track when a Master Effects parameter is being automated.
Use the timeline to:
- Select one or more regions.
- Drag regions along time.
- Move regions between compatible tracks.
- Draw a marquee selection rectangle.
- Trim region edges.
- Use region loop handles.
- Adjust fades.
- Right-click for context actions.
- Scroll horizontally through the project.
The ruler can show either time or bars. Right-click the ruler and choose Show time or Show bars.
The arrangement overview sits over the lower edge of the timeline when the project has regions, chords, or markers. It shows a compact map of the song, the visible viewport, and the playhead. Click or drag the overview to jump through longer arrangements without hunting through the horizontal scrollbar.

Chord Track
The Chord Track sits directly below the ruler. It contains beat-based chord blocks that act as the project harmony source for chord-tone fitting, chord-to-MIDI generation, and arrangement sketches.
Use the Chord Track to:
- Add chords at the playhead with the + button in the left Chords header.
- Add chords by clicking empty chord lane space.
- Select chord blocks.
- Drag chord blocks to move them in time.
- Drag the right chord handle to change duration.
- Preview a chord by double-clicking it.
- Right-click for chord actions.
- Use the Selection inspector progression presets for quick harmonic sketches.
- Enable Follow Chord Track on selected MIDI regions when you want playback and export to fit melodic notes to the current chord tones without rewriting the clip.
When a chord is selected, the Selection inspector shows project key/scale controls, chord fields including optional slash Bass, preview, chord-to-MIDI actions, duplicate, and delete.
The chord inspector also includes progression presets: Pop, Classic, Jazz turn, Rock, Minor pop, and Blues.
Track Headers
Track headers sit on the left of the timeline below the Chords header and stay vertically aligned with track lanes. Each track has:
- Track color.
- Track name.
- Mute M.
- Solo S.
- Record arm, where supported.
- Input monitor, where supported.
Bus and master tracks cannot record. Input monitoring is for audio tracks.
Right Dock
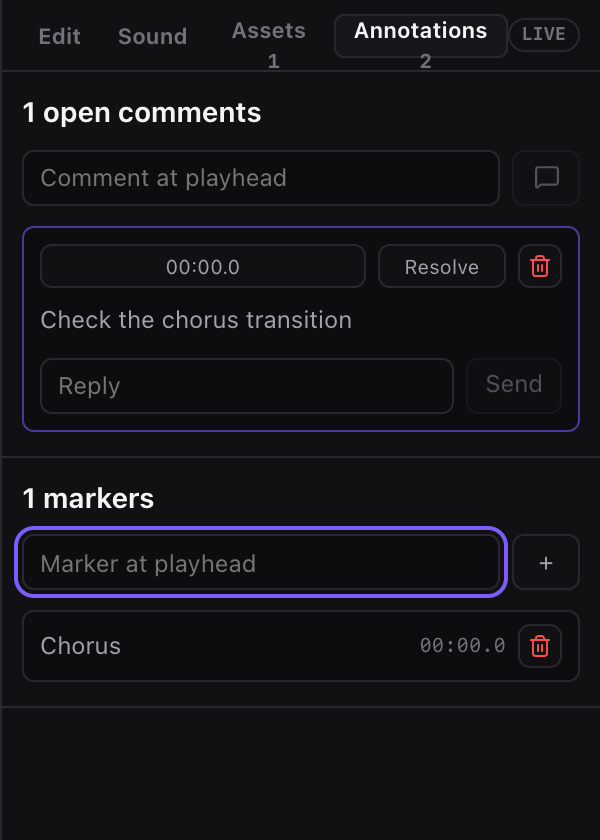
The right dock has three surface tabs:
| Surface | Use |
|---|---|
| Inspector | Selection details, selected-track Mix, Master/output controls, and MIDI instrument settings. |
| Instrument | Built-in instrument catalog, previews, filters, MIDI track loading, and instrument controls. |
| Markers | Timeline markers, section labels, short marker reminders, and marker-based generation targets. |
Inside Inspector, use the inner tabs by responsibility:
| Inspector tab | Use |
|---|---|
| Selection | Active-target summary, selected chord/region/note edits, clip tools, tempo tools, takes, and review/generation disclosures. |
| Mix | Selected-track mix, routing, sends, Track Effects, bus receives, and track options. |
| Master | Master/output effects, limiter, metering, and output automation targets. |
| Instrument | Selected MIDI track instrument settings, envelope, pads, and custom sample controls. |
The first card in Selection names the active edit target. Check that card before applying generation, tempo, take, or destructive edit actions. Mix is the selected-track channel strip. Master is the final output chain. Instrument appears when a selected MIDI track or MIDI region has instrument controls and catalog loading. Markers contains markers and section actions.
Bottom Panel
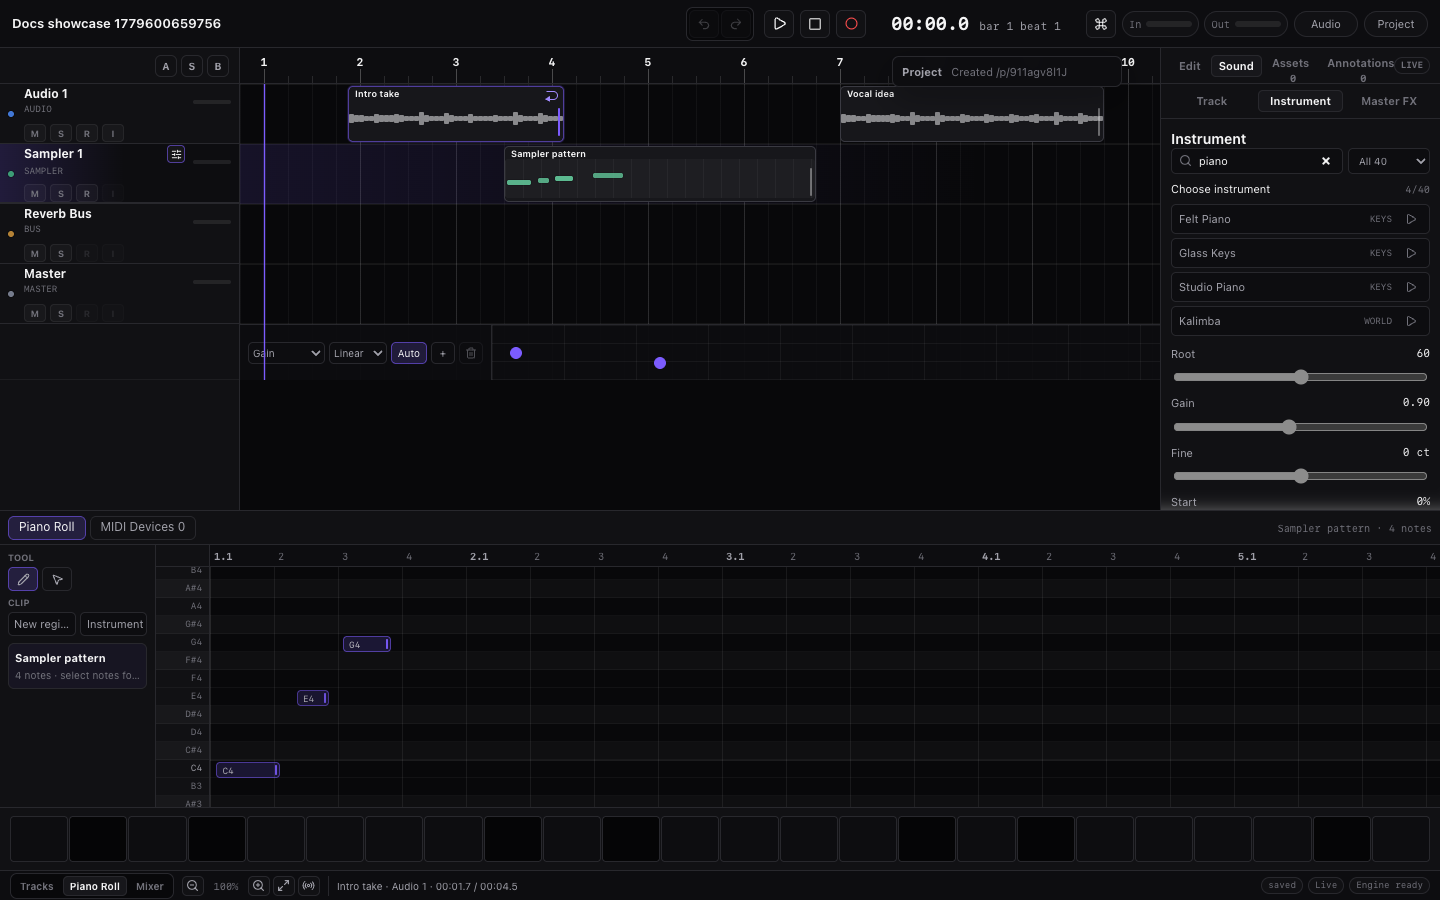
The arrangement timeline is always the main workspace. The bottom panel changes with the bottom bar selector:
| Mode | What Opens |
|---|---|
| Timeline | Timeline utility controls while the arrange view stays focused. |
| Piano Roll | MIDI note editor with draw/select tools and the active MIDI edit target. |
| Keyboard | Computer-keyboard performance map, octave controls, and chord/chromatic modes. |
| MIDI Tools | MIDI file import/export, Web MIDI connection, and selected-note transforms. |
| Audio | Audio import plus selected-region tempo, groove, slicing, and sample actions. |
| Automation | Automation lane visibility and routing to Mix, Effects, and Master lanes. |
The bottom utility bar contains the shared edit Grid, Abs/Rel snap mode, timeline zoom controls, fit timeline, follow playhead, selected-item count, recent edit feedback, save/collaboration status, export/history status, and audio failure status when needed.
Use the bottom selector as an editor switch, not as a mode that changes the whole app. For example, Piano Roll changes note editing, but the timeline, track headers, and right dock still keep their own responsibilities.
Bottom Panel Target Rules
Switching the bottom panel changes the focused editor surface. It does not automatically choose a new track, region, instrument, or automation lane.
| Bottom mode | It follows | Common target mistake |
|---|---|---|
| Piano Roll | The selected MIDI region and its owning MIDI track. | Drawing into the wrong clip because an older MIDI region is still selected. |
| Keyboard | The selected MIDI region or selected MIDI track. | Hearing the wrong instrument because another MIDI track is still the active instrument target. |
| MIDI Tools | The selected MIDI region or selected notes when a transform needs existing MIDI. | Importing or transforming without checking which MIDI clip is active. |
| Audio | The selected audio region for trim, Source BPM, Follow project tempo, slicing, and sample handoff. | Opening Audio mode while a MIDI region or no audio region is selected. |
| Automation | The visible Track Effect or Master Effects automation lane. | Expecting automation to appear before clicking an effect parameter's A button. |
If the bottom panel looks right but the edit affects the wrong thing, select the target again in the timeline or track header, then return to the bottom mode.
For the audio-region workflow behind the Audio bottom mode, see Audio Regions.
Automation stays hidden until there is a current Track Effect or Master Effects automation lane. For the most direct workflow, open Inspector > Mix or Inspector > Master, then click A beside the parameter you want to automate.
For the complete lane workflow, see Automation Lanes.
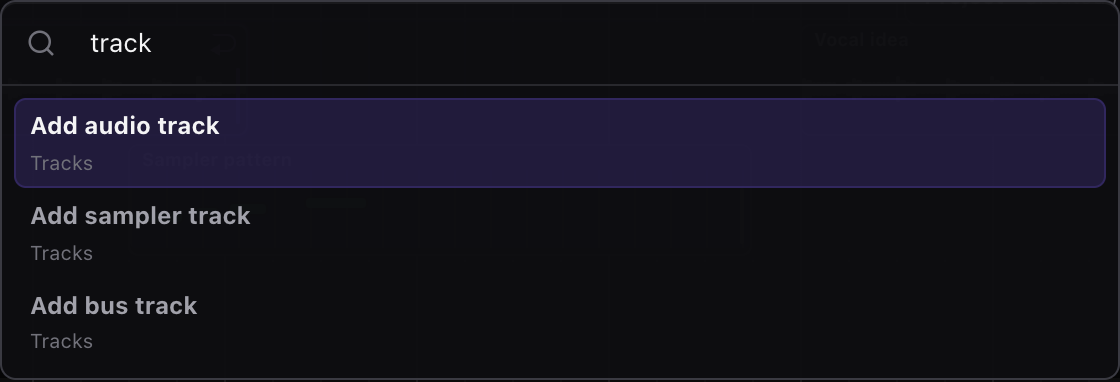
Actions Search
Open Actions with Cmd+K. Type to filter commands, then use:
ArrowDownandArrowUpto move.HomeandEndto jump.Enterto run.Escapeto close.
Actions mirrors commands that also exist in the visible UI, panels, or context menus. Use it when you know what command you want and the active target is already clear. Use the visible control or a context menu when placement or target safety matters. Edit commands in the palette follow the same active editor as keyboard shortcuts, so stale browser focus on a toolbar or old selection does not change what gets copied, pasted, duplicated, deleted, split, or nudged. Musical commands include adding common chord progressions, creating MIDI/arpeggio/bass from chords, regenerating chord-generated MIDI, humanizing groove, and fitting notes to the current scale or chord lane.
For exact placement, prefer the surface under your pointer: right-click a lane to import or paste there, right-click a region to split there, right-click an automation lane to add a point there, or open Instrument and read Load into before changing a track instrument.
Context Menus
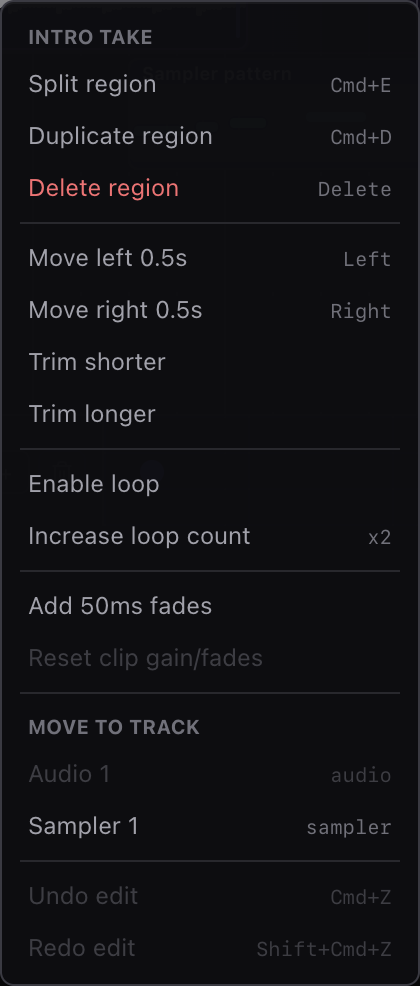
Right-click relevant areas to discover actions:
- Region: copy, cut, paste, split, duplicate, delete, move, trim, move to track, loop, fades.
- Chord block: copy, cut, paste, preview, create MIDI, create arpeggio, duplicate, delete.
- Chord lane: add chord here, paste copied chords, create MIDI, create arpeggio, create bass, add progression presets.
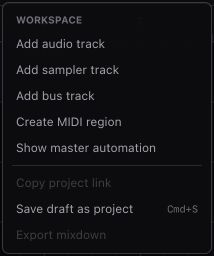
- Track header or lane: mute, solo, record arm, monitor, duplicate, reorder, add tracks, delete track.
- MIDI note: duplicate, delete, quantize, humanize, strum, fit to scale/chords, triads, seventh chords, transpose, velocity, arpeggio, select all.
- MIDI grid: add note, paste copied notes, select all, quantize/humanize/strum, fit to scale/chords, triads, seventh chords, arpeggio.
- Automation lane or point: add, copy, cut, paste, duplicate, delete Track Effect or Master Effects points, interpolation shape, enable/disable automation.
- Marker: go to, copy, cut, paste, duplicate, delete, or generate from a marker section.
- Timeline ruler: show bars/time, move playhead, and set/toggle/clear the transport loop range.
- Empty timeline: move playhead, add chord, create MIDI region, import audio here, add marker, add tracks, build arrangement.
For song-structure workflows built from markers, see Markers and Sections.
Realtime Meters
Miaou shows the input meter in the transport when recording or monitoring is active. Track headers show track and Master output metering, including a compact peak readout on each track fader, so mix level checks stay aligned with the timeline.
Related Pages
- Quick Start gives the shortest path from clean draft to saved project and export.
- Editing Basics explains the active editor and shared editing commands.
- Tracks, Routing, and Track Controls explains track headers, Mix, routing, sends, buses, and Master behavior.