Appearance
Effects and Automation
Miaou has two effect surfaces:
- Track Effects on audio and MIDI tracks.
- Master Effects on the final output.
It also has lane-based effect automation.
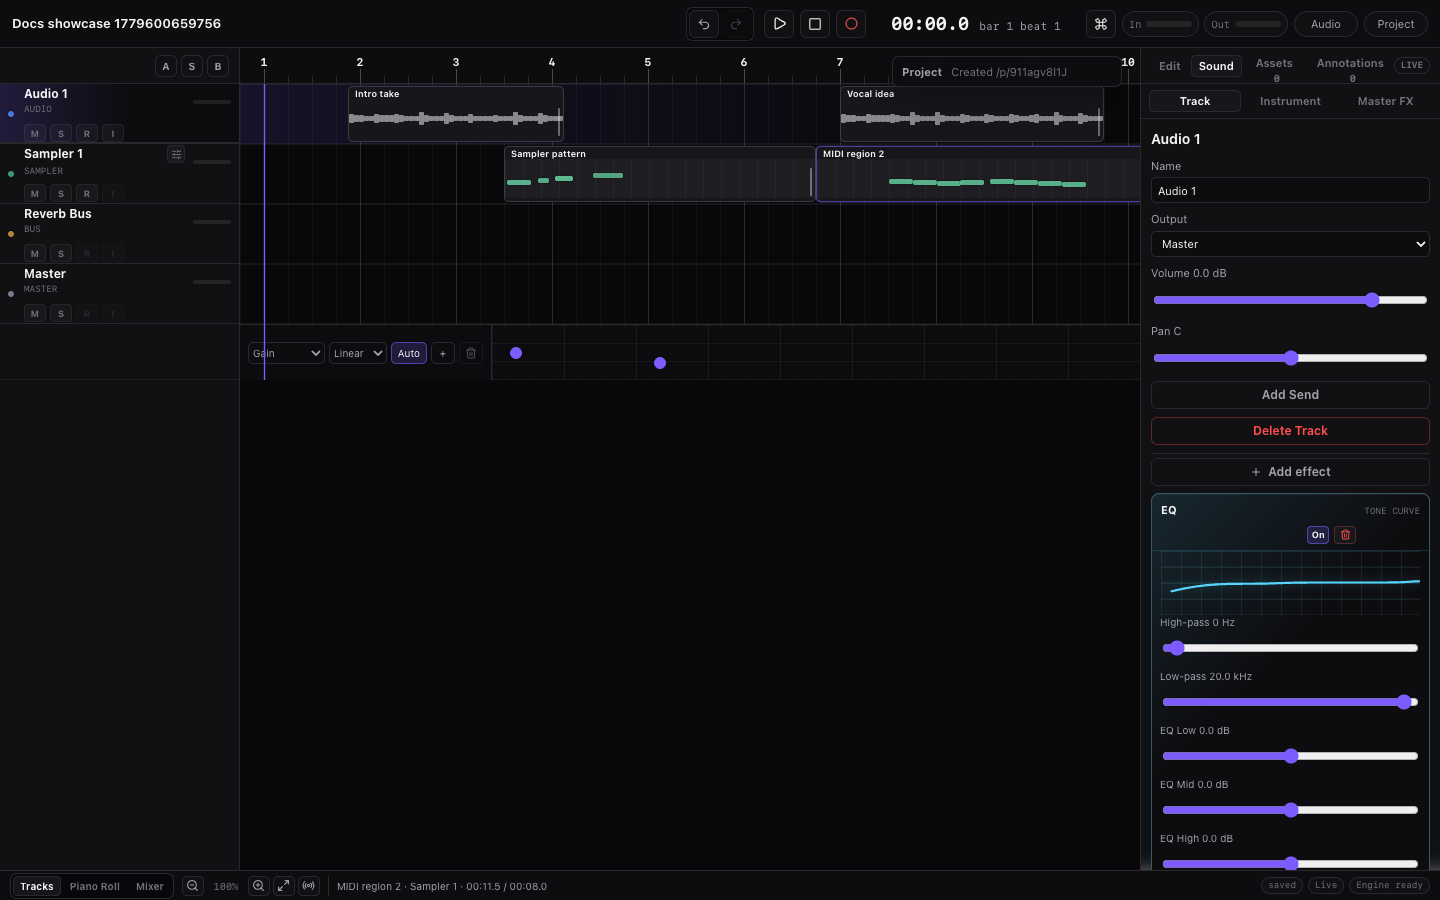
For a task-first path through levels, routing, effects, sends, sidechain, automation, Master checks, and export confidence, start with Mix and Automate. For a focused automation workflow, use Automation Lanes.
For the complete source-track, bus, Master, full-mix, stem, sidechain, and automation path in one place, see Signal Flow and Export Paths.
For a complete effect-by-effect manual with purpose, parameter behavior, and visuals, see Effect Reference.
Choose the Right Effect Surface
| Need | Use | Why |
|---|---|---|
| Shape one audio or MIDI track | Inspector > Mix > Track Effects on that source track. | Effects process that track before routing, sends, buses, and Master. |
| Route several tracks through one return | Send source tracks to a bus. | The bus collects receives, level, pan, mute, solo, and output routing in one place. |
| Make bass, pad, vocal, or a sustained layer duck | Compressor on the target source track. | The target gets quieter while the sidechain source triggers gain reduction. |
| Change the whole finished mix | Master. | Master Effects process the summed mix before final Master output controls. |
| Move an effect value over time | Parameter A button, then Automation lane. | Automation is read during playback and export instead of relying on one static value. |
| Check why an effect is not audible | Inspector > Mix signal-flow strip and effect bypasses. | Silence is often routing, mute/solo, Mix 0%, sidechain source, or Master output state. |
If you only want to learn what a specific knob does, use the Effect Reference. If you want to make the mix work, use this page and Mix and Automate.
Make an Effect Change Safely
Use this loop whenever you are unsure whether an effect is improving the mix:
| Step | Action | What you learn |
|---|---|---|
| 1 | Select the intended track, bus, or Master path. | The effect will be added to the correct signal path. |
| 2 | Add one effect or apply one preset. | You can hear that change without several effects masking it. |
| 3 | While playback runs, bypass and re-enable the effect. | You hear whether the effect helps or only gets louder. |
| 4 | Match output level with Utility, Output Gain, or the effect's output control if needed. | Louder is not mistaken for better. |
| 5 | Check the Mix signal-flow strip, meters, and warning pills. | Routing, mute/solo, sidechain, or Master state is not hiding the result. |
| 6 | Keep the effect, collapse it, or undo/remove it before adding the next effect. | The chain stays readable and intentional. |
If an effect seems silent, stop at step 5 before adding more gain. Most silent-effect problems are target, bypass, Mix amount, routing, mute/solo, sidechain key level, or Master output state.
Master Effects
Open Inspector > Master in the right dock, or select the Master track. The output chain contains effects with compact visuals, sliders, quick presets, and preview controls.
The Master track-head volume, balance, and mute controls sit after Master Effects as final output controls for realtime playback and mixdown export. They are not Track Effects and they are not part of source-track solo logic. Use Master Effects for tone, dynamics, space, and limiter settings; use the Master track head for final output level, balance, and mute.
The Master Effects panel starts with a Master Output strip showing final peak, RMS, fader, balance, and live/muted state. Use it to check whether a quiet or one-sided mix is caused by the final output controls or by an earlier track, bus, send, or effect.
Master effect parameter groups:
- Output gain and limiter.
- Metering with peak, RMS, stereo correlation, momentary/short-term/integrated LUFS-style loudness, and a log-frequency spectrum analyzer.
- Utility gain, stereo width, balance, mono, phase invert, and left/right swap.
- Parametric EQ with four switchable bands, Bell/Low shelf/High shelf/Notch modes, frequency, gain, Q, and analyzer overlay.
- Filters and EQ.
- Dynamics, including compressor, dynamic EQ, de-esser, gate, and transient shaping.
- Multiband dynamics for low/mid/high compression.
- Amp/cabinet drive, pedal drive, clipping, saturation, and lo-fi.
- Modulation with free-rate or tempo-synced chorus, flanger, and phaser sweeps.
- Movement with free-rate or tempo-synced tremolo, auto-pan, and auto-filter motion.
- Space, pitch, and tuned resonator color, including free-time or tempo-synced delay.
- Limiter.
The master limiter has an explicit switch.
Use the preset chips on an effect for musical starting points such as Safe, Loud, Low Cut, Mud, Bright, Glue, Bass, Ducking, Wider, Trim, 1/4 Sync, 1/8D, Room, Plate, or Hall. Click the small preview button beside a preset to audition it briefly without committing. Click the preset chip itself to apply it.
Track Effects
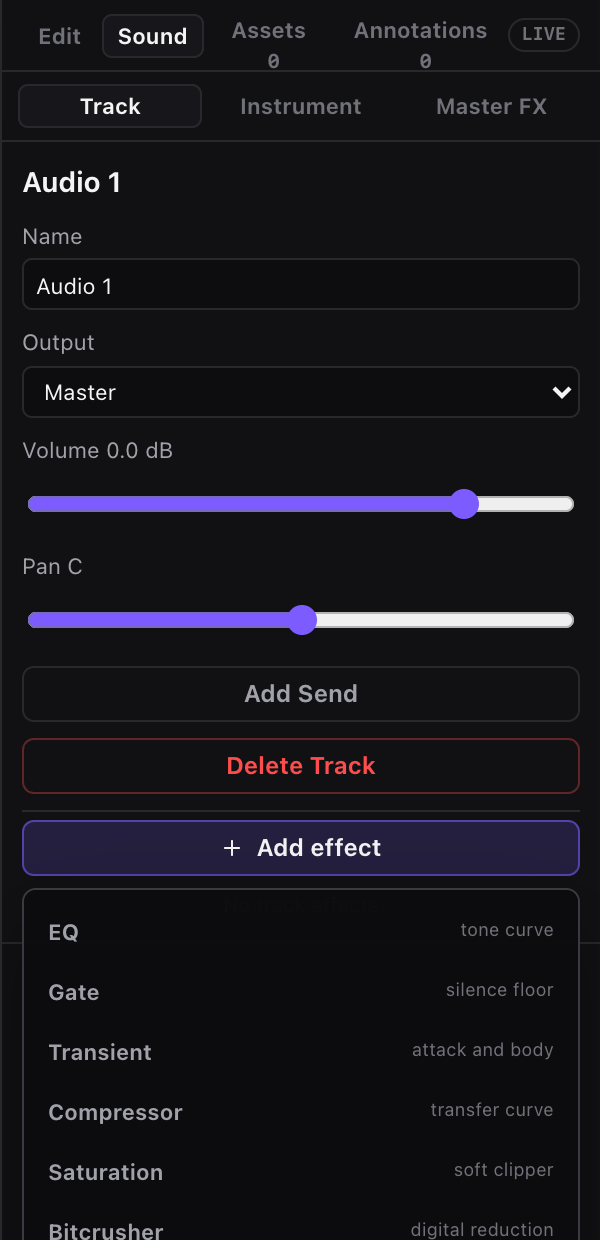
Select an audio or MIDI track and open Inspector > Mix. Click Add Effect in Track Effects to choose an effect. The picker stays open after adding an effect, so you can build a chain without reopening it for each effect. The rack shows a compact chain summary with serial order and On/Off state for each effect. The selected effect expands with visual feedback, preset chips, preview controls, parameter sliders, and switches where the control is binary; the other effects stay compact.
The Mix panel signal-flow strip above the routing controls shows how the selected track is connected: source, effect count, sends, output, and sidechain status. Check it when an effect seems silent or when a Compressor sidechain is not reacting as expected.
Select a bus track to see Receives in the Mix panel. It lists the direct routes and sends feeding that return, including send amount and first warning state, so you can confirm that the bus is actually being fed.
Track Effects are an ordered serial chain. Audio enters the first enabled effect, then the next one, and continues top to bottom before routing and sends. Duplicate effects of the same type are real separate processors, so two compressors, two EQs, or a distortion before and after a filter can intentionally stack. Effect order matters: an EQ before a compressor changes what the compressor reacts to, while an EQ after a compressor changes the already-compressed tone.
Bypass disables that effect while keeping its place, settings, and automation target. Remove deletes the effect from the chain. If you need an A/B test, bypass first; remove only when you no longer need the effect.
Available Track Effects by job:
| Job | Start with |
|---|---|
| Metering and utility | Meter, Utility. |
| EQ, filter, and pitch setup | Parametric EQ, EQ, Auto-filter, Pitch. |
| Dynamics and level control | Gate, Transient, Compressor, Multiband Dynamics, De-esser, Dynamic EQ, Limiter. |
| Color, drive, and clipping | Saturation, Amp / Cab, Pedal, Clipper, Bitcrusher. |
| Modulation | Chorus, Flanger, Phaser, Tremolo, Auto-pan. |
| Time and space | Delay, Reverb, Room. |
| Creative sound design | Shifter, Resonator, Vocoder. |
For full explanations of what each effect does and how every parameter changes the sound, see Effect Reference.
Track Effects are for audio and MIDI source tracks. Bus and master tracks use their routing, receives, and Master output controls instead.
Build a Simple Track Chain
Use this order when you want a reliable first pass on one track:
- Select the track and open Inspector > Mix.
- Add Parametric EQ or EQ first if the track needs cleanup.
- Add Compressor, Gate, Transient, or Clipper only when level, punch, noise, or peaks need control.
- Add Delay, Reverb, Chorus, or other space/movement effects after the tone and dynamics are roughly right.
- Add Utility or Meter when you need a gain, mono, width, balance, or level check.
- Bypass each effect once while playing to confirm it is helping.
Keep the first chain short. One clear EQ move, one dynamics move, and one space effect are easier to trust than a tall rack of small changes. Keep effects you are not editing compact so the rack stays readable, and use the chain summary to confirm serial order before export.
Common useful orders:
| Source | First chain to try |
|---|---|
| Vocal or lead line | Parametric EQ → Compressor → De-esser. |
| Bass | EQ → Compressor → Saturation or Utility. |
| Drums | Transient → Clipper → Compressor. |
| Pad or keys | EQ → Chorus or Utility → Reverb. |
| Guitar/pluck | EQ → Pedal or Amp / Cab → Delay. |
Compressor Track Effects can follow another audio or MIDI track as a sidechain key input. Use this for ducking, such as lowering a pad, bass, or sustained layer whenever a kick or vocal track hits. The keyed source can be routed to None if you want it to trigger compression without being heard in the mix.
The Compressor card shows the current key source, key level, and estimated gain reduction. Use it as a fast confidence check: if key level stays at -∞ dB, the source is silent or not playing; if estimated gain reduction stays at 0.0 dB, lower the threshold, raise the key/source level, or check that the compressor is enabled.
Signal Flow and Export
The normal signal path is:
- Audio region or MIDI instrument.
- Source-track Track Effects, in listed order.
- Track volume and pan.
- Sends and output routing to Master, a bus, or None.
- Bus returns when used.
- Master Effects.
- Master track-head mute, volume, and balance.
- Realtime playback or full-mix export.
Realtime playback and export are expected to match. The exported project-mix.wav includes source tracks, routing, bus returns, Track Effects, Master Effects, automation, and Master track-head mute/volume/balance. Per-track stems are source-track based: they include the source track's sound and Track Effects, but they do not include final Master Effects or final Master track-head controls.
Use Master Effects for final tone, loudness, metering, and limiter work. Use the Master track head for final output mute, volume, and balance. Master solo is absent because soloing the final output is not meaningful.
Common Effect Starting Points
| Goal | Starting point |
|---|---|
| Clean rumble | Add EQ and try Low Cut, or use Parametric EQ to cut low-mid mud. |
| Tame uneven level | Add Compressor after cleanup EQ, then try Glue or Bass. |
| Duck to kick | Add Compressor on the target track and set Sidechain Source to the kick. |
| Wider pad | Add Utility and try Wider, or add Chorus after tone shaping. |
| Loud drums | Try Clipper Drum or Saturation Drum before Limiter. |
| Vocal harshness | Try De-esser or Dynamic EQ before broad EQ boosts. |
| Shared space | Use Track Reverb on the source that needs space, or Master Reverb for full-mix color. |
Common mistakes are leaving an effect bypassed, setting Mix to 0%, placing a compressor before the EQ move you expected it to react to, setting a sidechain source but muting the key track with normal mute instead of routing it to None, or judging a louder preset without level-matching output.
Effect Visuals
Effects use compact visuals to make them easier to identify and read while mixing:
- Parametric EQ analyzer overlay and simple EQ curves.
- Gate/compressor/dynamic EQ/de-esser threshold curves.
- Multiband dynamics transfer curve.
- Amp/cabinet tone curve, pedal, saturation, clipper, bitcrusher, shifter, and vocoder transfer/step views.
- Chorus/flanger/phaser modulation views.
- Tremolo/autopan movement views.
- Delay taps.
- Reverb/room tails with style, decay, damping, and width feedback.
- Pitch steps and resonator modes.
- Utility width/balance curve.
- Meter peak/RMS/correlation readout and spectrum analyzer.
- Output meter/limiter ceiling.
The visual is a readout and recognition aid. The sliders, switches, menus, and presets are the controls that change the sound.
Automation Lane
Automation is hidden until you ask for it. Click the small A button beside an automatable effect parameter. Miaou opens a contextual automation row directly below the affected track, titled with the automated parameter.
If you are learning automation for the first time, start with Automation Lanes. The section below is the shorter reference version for effect parameters and signal flow.
For Track Effects, select an audio or MIDI track, open Inspector > Mix, and click A beside a Track Effect parameter such as Band 2 Gain, Delay Mix, Filter Rate, Mono, or Reverb Mix. The automation row appears under that track.
For Master Effects, open Inspector > Master and click A beside a master effect parameter such as Gain, Reverb, or Limit Ceiling. The automation row appears under the Master track.
After an automation lane exists, you can reopen or hide it from the contextual bottom Automation control or the empty-workspace context menu. Miaou shows one automation row at a time to keep the arrangement readable. The row header shows whether the lane is reading automation or muted, plus the number of points in the lane.
Use the target picker in the row header to move the lane to another automatable parameter. Track Effect targets are grouped by effect in the selected track's effect chain, and Master Effect targets are grouped by effect family.
Parameter rows show Automated once an enabled lane has points for that control. This means realtime playback and export read the lane over time instead of treating the static slider as the whole story. If the lane has points but is disabled, the row shows Muted and playback/export use the current control value.
Use automation to change effect values over time, such as:
- Fade master gain.
- Sweep a filter.
- Increase delay during a transition.
- Open reverb at the end of a section.
Track-head faders, pans, and mute/solo switches are live mix controls. They save with the project, but automation lanes are for Track Effect and Master Effects parameters.
Automation Points
Click the automation curve to add a point at the clicked time/value. Drag points horizontally to change timing and vertically to change value.
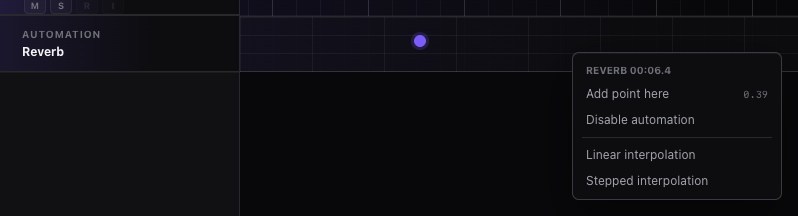
Right-click the automation lane and choose Add point here when you want exact context-menu placement.
Automation points can be selected, copied, cut, pasted, duplicated, nudged, and deleted. Use Cmd/Ctrl-click to add or remove points from the selection, Shift-click to select a range in the lane, and Cmd/Ctrl+A while working in the automation lane to select every point. Drag one selected point to move the selected group together; timing and value offsets stay relative while the points snap to the current grid. Hold Option / Alt while dragging selected points to leave the originals in place and preview ghost duplicate points. Use ArrowLeft / ArrowRight to nudge timing and ArrowUp / ArrowDown to nudge value; add Shift for a larger step. Keyboard-pasted point groups keep their spacing and land at the playhead in the open automation lane. Right-click an automation lane or point and choose Paste point here to paste at that clicked time and lane.
Grouped automation moves keep their timing and value shape until the group reaches time 0 or the automated parameter's minimum or maximum value.
Right-click an automation point for:
- Copy point
- Cut point
- Duplicate point
- Paste point here
- Delete point
- Linear interpolation
- Stepped interpolation
- Enable automation or Disable automation
Linear vs Stepped
| Shape | Behavior |
|---|---|
| Linear | Smoothly interpolates between points. |
| Stepped | Holds the previous point value until the next point. |
Use linear for fades and sweeps. Use stepped for abrupt changes.
Undo
Automation edits are part of the app editing model where applicable. Use the global undo/redo controls or keyboard shortcuts when an automation edit should be reverted.
Related Pages
- Mix and Automate gives the task-first workflow for balancing, routing, sidechain, automation, and final checks.
- Automation Lanes gives the focused workflow for creating, editing, copying, pasting, muting, and troubleshooting automation points.
- Effect Reference lists every effect, parameter, preset starting point, and screenshot.
- Tracks, Routing, and Track Controls explains effects, sends, buses, master controls, mute/solo, and export signal flow.