Appearance
Quick Start
From a new browser session, follow these steps to create a saved, playable project.
If you are setting up audio input, Web MIDI, browser permissions, or realtime playback for the first time, keep Browser and Device Setup open beside this page.
If Miaou is your first DAW, read DAW Basics alongside this page for plain explanations of tracks, regions, audio, MIDI, buses, Master, stems, and tempo-following audio.
If editing shortcuts ever feel ambiguous, read Editing Basics. It explains the active editor, selection, copy/paste, duplicate, trim, split, loop, and undo.
For task-first walkthroughs such as making a complete first loop, making a first beat, recording MIDI, speeding up an imported song, analyzing MIDI into chords, generating editable parts, loop-recording takes, sidechaining to a kick, exporting stems, or writing with only the computer keyboard, see Workflow Recipes.
The First 10 Minutes
If you want the smallest useful tour, do this once:
- Open Miaou and click Save so the draft becomes a real project link.
- Add one piece of material: a MIDI region, an imported audio file, a recorded audio take, or a chord progression. For the fastest full sketch, follow Make a First Complete Loop.
- Press
Spaceto play. - Select the material you created and make one edit: move it, trim it, duplicate it, change the instrument, or add an effect.
- Press
Cmd+Sto create a recovery version. - Click Export, create a ZIP, and confirm the exported mix exists.
That path teaches the core loop: create, edit, save, recover, export.
Open the App
Open Miaou in desktop Chrome. New sessions start as a clean, silent draft with an empty chord lane, an audio track, a MIDI track, an empty Reverb Bus routing track, and the master output. There are no prefilled regions, chord blocks, markers, or demo sounds on the timeline. You can record, import audio, create MIDI, choose an instrument, or drop files. The draft is not a saved project until you create or unlock one.
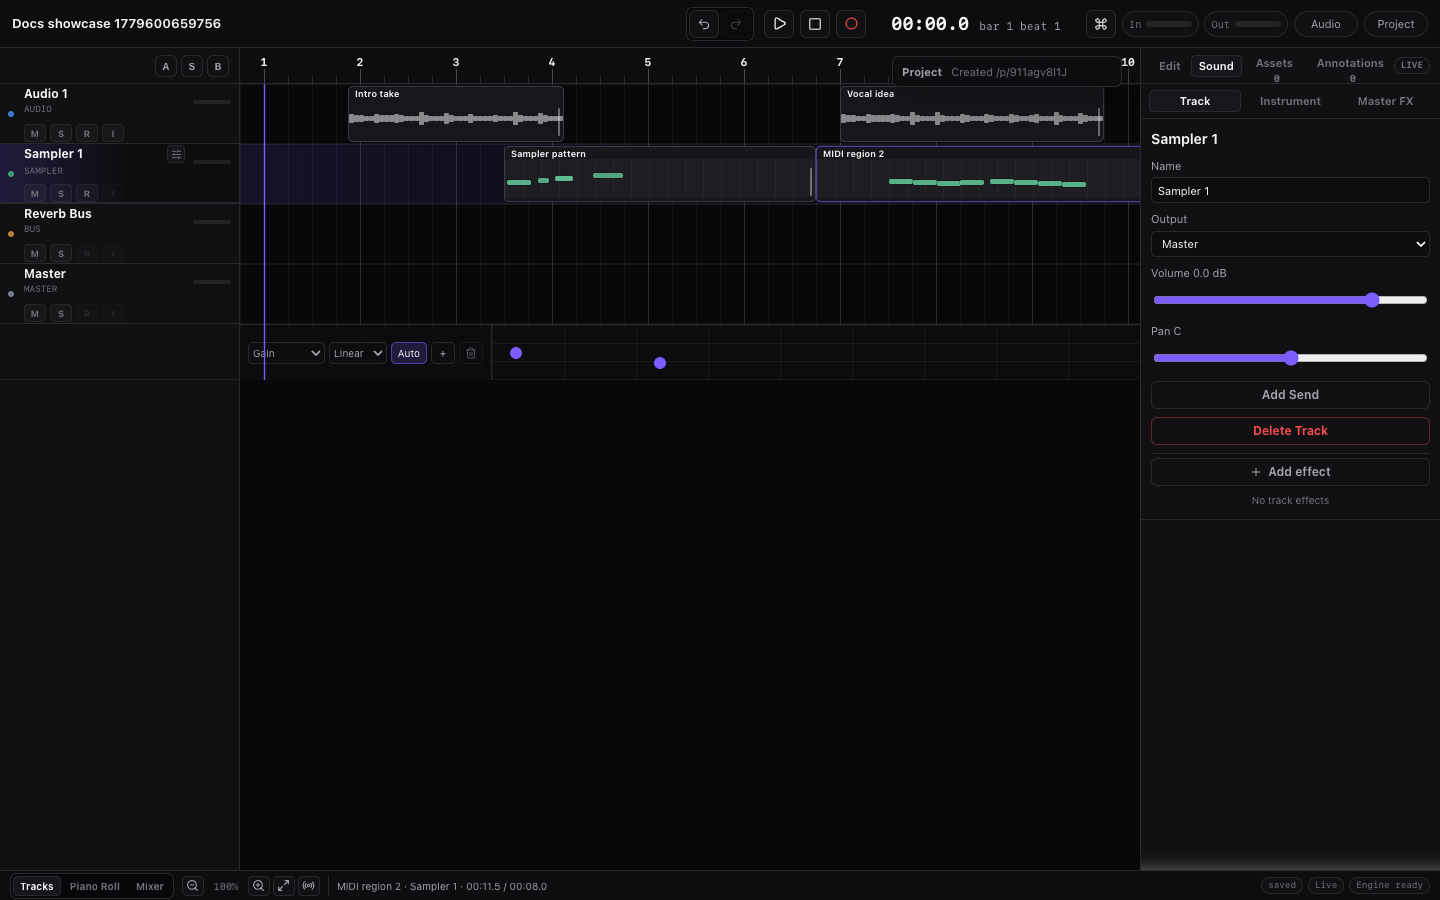
The top transport has the project title and state, Undo/Redo, a Play/Stop toggle, Record, metronome, count-in, a time readout, an input meter while recording or monitoring, and visible project actions.
Save the Draft as a Project
Click Save while you are still in a draft to save the clean project. The dialog sets a title and password; it does not add musical content or replace the current draft.
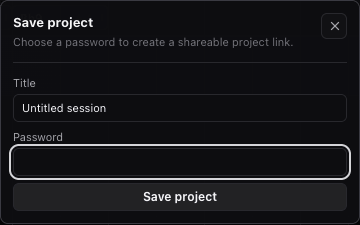
- Click Save in the top transport bar.
- Enter a Title.
- Enter a password with at least 8 characters.
- Click Save project.
Miaou creates a project with a unique link such as /p/.... Keep the project link and password. Miaou cannot recover a lost project password.
After the save finishes, check these visible signs before recording, sharing, or closing the tab:
| Check | What you should see |
|---|---|
| Browser address | The URL is a project link that starts with https://miaou.app/p/. |
| Top-bar project title | The project title you entered is visible. |
| Project actions | Share, Export, and History are available. |
| Project status | Save/sync status is settled instead of saving, blocked, or incomplete. |
Save before recording or sharing
A draft is good for sketching, but recording, uploaded media restore, collaboration, and share links expect a saved project.
For the full save/share/export checklist, see Save, Share, and Export.
Save Work
Saved projects write changes automatically. Use one of these when you want an explicit recovery version:
- Press
Cmd+S. - Click History, then click Save version.
The bottom bar shows unsaved work, save errors, audio startup errors, and live collaboration state. Versions create entries under History, where older moments can be opened in a read-only tab, restored into the live project, or forked into a new editable project.
Choose What to Add First
After saving the draft, pick one source of material and make sound. You do not need to learn every editor before you start.
| First material | Fast path |
|---|---|
| MIDI notes | Select the MIDI track, open Piano Roll, click Create MIDI, then draw notes. |
| Drum beat | Select a MIDI track, open Instrument, load 808/909 Kit or Studio Drum Kit, then use drum lanes. |
| Imported audio | Drag audio onto the timeline, or right-click a lane and choose Import audio here. |
| Recorded audio | Select an audio track, arm it, check the transport target, then press Record. |
| MIDI performance | Select a MIDI track, load an instrument, open Keyboard or connect Web MIDI, then record notes. |
| Chord progression | Click the Chord Track lane or use a progression preset, then generate editable MIDI from the chords. |
| Existing MIDI file | Open bottom MIDI Tools, import the file, then load instruments for the created MIDI tracks. |
| Mix/effect practice | Select any track with material, open Inspector > Mix, then add EQ, Compressor, Delay, or Reverb. |
Target check
Before adding or changing an instrument, read the target label on the surface you are using.
| Surface | Check this target first |
|---|---|
| Instrument | The MIDI track that will receive the instrument. |
| Piano Roll | The MIDI region or MIDI track being edited. |
| Inspector > Mix | The track, bus, or Master path being processed. |
| Selection | The selected region, chord, marker, note, or group. |
Play the Project
Click Play or press Space. The playhead moves across the ruler and timeline. The same button changes to Stop while playing; click it or press Space again to stop playback.
The time readout shows minutes/seconds by default. Right-click the timeline ruler and choose Show bars when you want the ruler and secondary transport readout in bars/beats.
If you add chord blocks, click Build arrangement in the Selection panel to create editable Harmony, Bass, Arp, and kit-backed Drum MIDI regions from the visible chords. When you already have MIDI, use Analyze and Generate to turn it into reviewed Chord Track blocks first.
Add a Built-In Instrument
- Select a MIDI track and open Instrument in the right dock.
- Confirm Instrument names the MIDI track you want to change.
- Use Starter, All, a family filter, or search to find an instrument.
- Click the small preview icon to audition an instrument without changing the project.
- Click the instrument row to load it onto the selected MIDI track.
Preview and load are separate. Preview plays a temporary phrase; loading changes the selected MIDI track and saves that instrument with the project. Search is global even when Instrument opens on the compact Starter palette, so searches like kit, trumpet, marimba, riser, or guitar can find full-catalog instruments without clicking All first.
Use full drum-kit instruments such as 808/909 Kit or Studio Drum Kit for drums. Individual kit pieces appear as named drum lanes in the Piano Roll. Transition FX such as Reverse Cymbal, Riser, Sub Hit, or Tape Stop are playable MIDI instruments: load one on a MIDI track, then place a note where the one-shot should trigger.
Miaou includes keys, basses, guitars, plucks, strings, orchestral sounds, brass, woodwinds, mallets, world instruments, synths, voices, drums, percussion, and effects.
Sketch Chords
Fastest path: add a chord progression, choose an arrangement style in the Selection inspector, then click Build arrangement. Miaou creates editable layered MIDI regions and opens the piano roll.
- Use the + button in the Chords header, click empty space in the chord lane below the ruler, or choose a progression preset in Selection.
- Select a chord block.
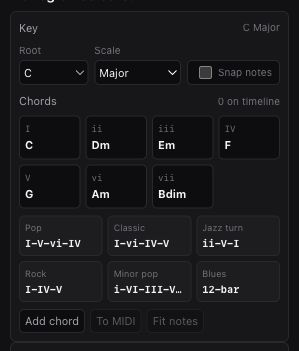
- In Selection, set the project Root, Scale, and optional Snap notes.
- Use the progression presets for common patterns, or change the selected chord Root, Type, Ext, Inv, Start, or Beats.
- Click Preview to hear the selected chord.
- Click Make MIDI, Arp, or Bass to create a MIDI region from the chord.
Use the diatonic chord palette in the same inspector to add chords from the current key/scale. Use Pop, Classic, Jazz turn, Rock, Minor pop, or Blues for quick progression sketches.
Use Build arrangement after editing the chord lane when you want Miaou to create layered Song, Dance, Ambient, or Cinematic MIDI tracks from the full progression. Song and Dance arrangements include editable drum tracks with built-in drum sounds. For the full analysis, review, generation, and regeneration workflow, see Analyze and Generate.
Create a MIDI Region
- Click Piano Roll in the bottom bar.
- Click Create MIDI in the MIDI toolbar, or right-click the timeline and choose Create MIDI here.
- Select the draw tool.
- Click in the piano roll grid to add notes.
- Drag notes to move them, drag their right handle to trim them, and drag the velocity line inside a note to edit velocity.
MIDI regions are placed on MIDI tracks. If there is no MIDI track, add one first from the track add controls or a track/timeline context menu.
When you want to play without a MIDI controller, open Keyboard in the bottom bar. The selected MIDI region or selected MIDI track controls which instrument you hear. See Use Only the Computer Keyboard to Sketch Notes.
Record Audio
- Select or create an audio track.
- Arm the track with the record-arm icon on the track header.
- Choose metronome/count-in settings in the transport if needed.
- Click the Record button.
- Miaou shows the recording target in the transport, highlights the target lane, starts playback, moves the playhead, and draws the recorded region while recording.
- Click Record again to stop.
The recorded take becomes an audio region. If you record through a transport loop, Miaou can create several takes and expose take choices in the Selection inspector. See Takes and Comping for the loop-take workflow.
Import Audio
- Drag audio directly to the timeline, or right-click the timeline and choose Import audio here.
- Choose the import tempo policy when it is visible: Keep original, Follow project tempo, or Set project tempo from sample.
- Choose an audio file.
- To make the region follow the project BPM later, select it, enter Source BPM if needed, enable Follow project tempo, and choose Default, Beats, Tones, or Tape under Stretch mode.
- Copy, paste, duplicate, or loop the created region. To turn it into a playable instrument, select the audio region and click Use in {track name} or Create instrument from region. If there is no MIDI track, Miaou creates one.
For audio-region trim, fades, clip gain, transients, slicing, custom samples, and media restore, see Audio Regions.
Imported audio is saved with the project when the project is unlocked. Tempo-following audio is non-destructive; Miaou keeps the original source file and stores timing choices on the region.
For a deeper explanation of project BPM, Source BPM, import policies, stretch modes, and why BPM changes only affect enabled regions, see Tempo and Follow Project Tempo.
BPM and imported audio
Changing the top-bar BPM does not automatically stretch every audio file. Select the audio region, enable Follow project tempo, and set Source BPM when needed.
Add Effects
For track effects:
- Select an audio or MIDI track.
- Open Inspector > Mix in the right dock.
- Click Add Effect in the Track Effects section and choose an effect.
- Use a preset chip such as Warm, Bright, or Glue for a fast starting point, or click the small preview button beside a preset to audition it.
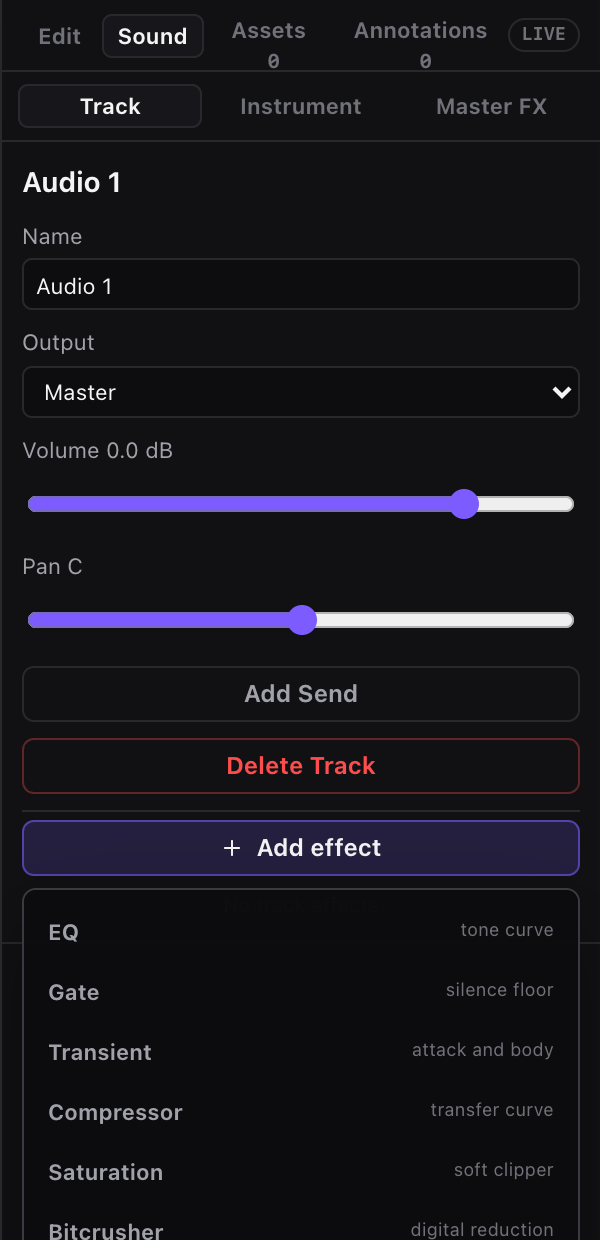
To automate a track effect parameter, click the small A beside that Track Effect slider. Miaou opens the automation row under the selected track.
For master effects:
- Open Inspector > Master in the right dock.
- Adjust the output effects, apply presets, or preview presets before committing.
To automate a master effect parameter, click the small A beside that parameter. Miaou opens the automation row under the Master track.
Collaborate
Share the project link and password with another user. When both users unlock the same project, Miaou shows collaborator presence. Edits sync through the shared project, and remote activity may temporarily lock edited items to avoid conflicting changes.
Export
- Save the project.
- Press
Spaceand confirm the project sounds the way you expect. - Click Export in the top bar.
- Click Export ZIP.
- Keep the tab open while Miaou renders.
- When export status is ready, click Download ZIP.
The ZIP contains the rendered full mix, project data, referenced media, and stems when the project fits the stem-size guard.
For the pre-export checklist and full mix/stem differences, see Export a Full Mix and Stems. For import/export details, see Import and Export.
Related Pages
- DAW Basics explains the core Miaou words before you dive deeper.
- Workflow Recipes gives task-first paths for beats, audio import, recording, chords, effects, sharing, and export.
- Troubleshooting is the symptom map when playback, save, recording, sounds, or export behave unexpectedly.